docker exec -it couchmusic /bin/bashManually create a Couchbase data bucket and load Data
Introduction
A huge part of this Couchify application will involve accessing data from the Couchbase database. In order to set up the database for testing and ultimate use by your application, it will be necessary to install and configure Couchbase server and load some data into it.
In this lab, you create the data buckets and load documents you will use in later labs. Then, you will browse the data, just to gain familiarity with the way the data is structured. In later labs, you will be using various versions of couchmusic data sets that represent different ways to model data. In this lab, you will create the buckets and load the data for all of the different versions.
What you will gain experience with:
-
Manually creating data buckets
-
Loading documents into buckets using cbimport
Estimated time to complete: 45 minutes
Instructions
Manually create buckets
-
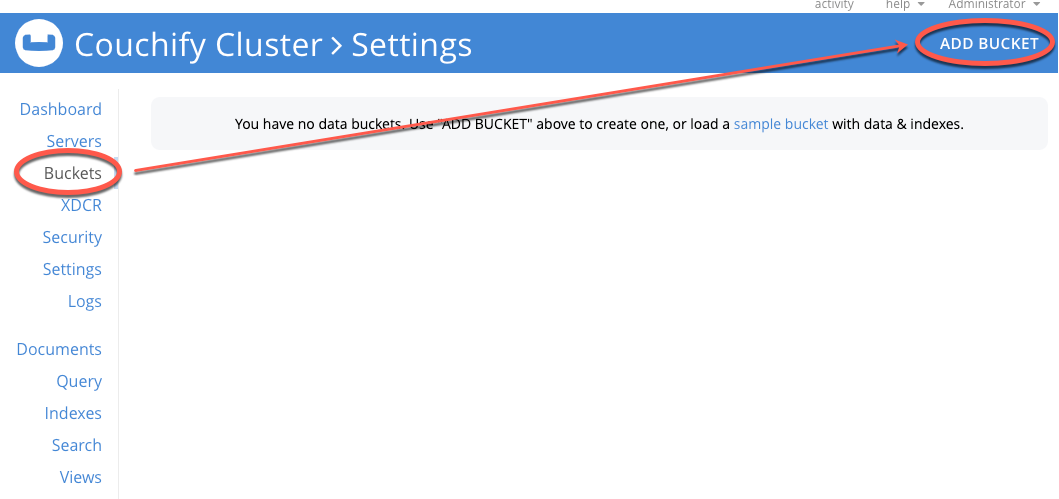
In the Couchbase administration console (http://localhhost:8091), navigate to the Buckets view, and select Add Bucket. Review all settings, and accept all defaults, except for these:
-
Name: couchmusic1
-
Memory Quota: 128mb
-
Advanced bucket settings (click)
-
Replicas: Disabled (uncheck)
-
Flush: Enabled (check)
-

-
-
Create two additional buckets couchmusic2 and couchmusic3 using the same settings.
Load documents into couchmusic using cbimport
-
Load the couchmusic data file to Couchbase. The way you do this will depend on how Couchbase has been installed
-
Using Docker
-
Log onto the Docker container
-
Unzip the COUCHMUSIC.zip file
The COUCHMUSIC.zip data file has already been loaded onto the docker container. All that is necessary is to unzip it.
cd /tmp
unzip COUCHMUSIC.zip
-
-
Local Couchbase installation
-
Open a Terminal (Command) window, navigate to the appropriate Couchbase bin folder, and briefly review the contents of this folder. Notice the cbimport and other tools.
MacOS
/Applications/Couchbase Server.app/Contents/Resources/couchbase-core/bin
Windows
C:\Program Files\Couchbase\Server\bin
Linux (including Docker)
/opt/couchbase/bin
-
Add this bin folder to the PATH environment variable for your operating system, so that its commands may be invoked from any command line location. See your operating system documentation for details on this process.
-
Download the couchmusic data files to your desktop using this Download link.
-
Use your unzip tools (command line, windows, etc) to unzip the COUCHMUSIC.zip files
-
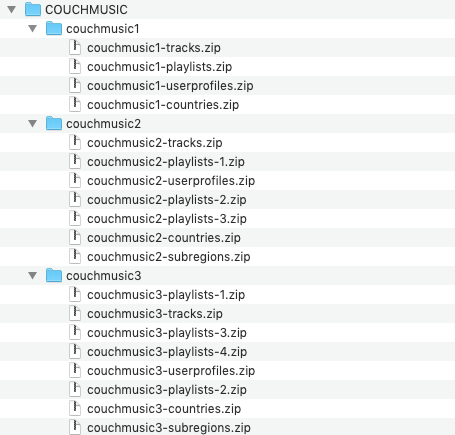
In the Terminal or Command window, navigate to your project folder containing the unzipped couchmusic data files file. Verify files have been successfully unzipped as shown.

-
-
-
Use cbimport to load the JSON documents in the various data couchmusic data files to the couchmusic buckets. In some cases, you will need to assign the id element of each record as its document key, prefixed by a the type element of each record as a document type identifier, using "::" as a separator.
-
Cluster (-c): couchbase://127.0.0.1
-
Username (-u): Administrator
-
Password (-p): password
-
Bucket (-b): myBucket
-
Format (-f): sample
-
Dataset (-d): file://couchmusic-file.zip
-
Threads (-t): 2
-
Key Pattern to Generate (-g): %type%::%id% (optional pattern generation)
Load the data for the couchmusic1 bucket as follows.
Change directories to the folder containing the couchmusic1 zip files. Issue the following cbimport commands.
cbimport json -c couchbase://127.0.0.1 -u Administrator \
-p password -b couchmusic1 -f sample \
-d file://couchmusic1-tracks.zip -t 2

cbimport json -c couchbase://127.0.0.1 -u Administrator \
-p password -b couchmusic1 -f sample \
-d file://couchmusic1-countries.zip -t 2

cbimport json -c couchbase://127.0.0.1 -u Administrator \
-p password -b couchmusic1 -f sample \
-d file://couchmusic1-playlists.zip -t 2

cbimport json -c couchbase://127.0.0.1 -u Administrator \
-p password -b couchmusic1 -f sample \
-d file://couchmusic1-userprofiles.zip -t 2
For windows, you can use the following instructions, which uses a Windows-specific line break.
cbimport json -c couchbase://127.0.0.1 -u Administrator ^
-p password -b couchmusic1 -f sample ^
-d file://couchmusic1-tracks.zip -t 2

cbimport json -c couchbase://127.0.0.1 -u Administrator ^
-p password -b couchmusic1 -f sample ^
-d file://couchmusic1-countries.zip -t 2

cbimport json -c couchbase://127.0.0.1 -u Administrator ^
-p password -b couchmusic1 -f sample ^
-d file://couchmusic1-playlists.zip -t 2

cbimport json -c couchbase://127.0.0.1 -u Administrator ^
-p password -b couchmusic1 -f sample ^
-d file://couchmusic1-userprofiles.zip -t 2
Load the data for the couchmusic2 bucket as follows
In this series of commands, you will utilize an additional option that will calculate or generate a key based on elements of the data in various zip files associated with the couchmusic2 data set.Change directories to the folder containing the couchmusic2 zip files. Issue the following cbimport commands.
cbimport json -c couchbase://127.0.0.1 -u Administrator \
-p password -b couchmusic2 -f sample \
-d file://couchmusic2-countries.zip -t 2 -g %type%::%countryCode%

cbimport json -c couchbase://127.0.0.1 -u Administrator \
-p password -b couchmusic2 -f sample \
-d file://couchmusic2-tracks.zip -t 2 -g %type%::%id%

cbimport json -c couchbase://127.0.0.1 -u Administrator \
-p password -b couchmusic2 -f sample \
-d file://couchmusic2-subregions.zip -t 2 -g %type%::%region-number%

cbimport json -c couchbase://127.0.0.1 -u Administrator \
-p password -b couchmusic2 -f sample \
-d file://couchmusic2-userprofiles.zip -t 2 -g %type%::%username%

cbimport json -c couchbase://127.0.0.1 -u Administrator \
-p password -b couchmusic2 -f sample \
-d file://couchmusic2-playlists-1.zip -t 2 -g %type%::%id%

cbimport json -c couchbase://127.0.0.1 -u Administrator \
-p password -b couchmusic2 -f sample \
-d file://couchmusic2-playlists-2.zip -t 2 -g %type%::%id%

cbimport json -c couchbase://127.0.0.1 -u Administrator \
-p password -b couchmusic2 -f sample \
-d file://couchmusic2-playlists-3.zip -t 2 -g %type%::%id%
Here are the corresponding commands using the Windows line break
cbimport json -c couchbase://127.0.0.1 -u Administrator ^
-p password -b couchmusic2 -f sample ^
-d file://couchmusic2-countries.zip -t 2 -g %type%::%countryCode%

cbimport json -c couchbase://127.0.0.1 -u Administrator ^
-p password -b couchmusic2 -f sample ^
-d file://couchmusic2-tracks.zip -t 2 -g %type%::%id%

cbimport json -c couchbase://127.0.0.1 -u Administrator ^
-p password -b couchmusic2 -f sample ^
-d file://couchmusic2-subregions.zip -t 2 -g %type%::%region-number%

cbimport json -c couchbase://127.0.0.1 -u Administrator ^
-p password -b couchmusic2 -f sample ^
-d file://couchmusic2-userprofiles.zip -t 2 -g %type%::%^username^%

cbimport json -c couchbase://127.0.0.1 -u Administrator ^
-p password -b couchmusic2 -f sample ^
-d file://couchmusic2-playlists-1.zip -t 2 -g %type%::%id%

cbimport json -c couchbase://127.0.0.1 -u Administrator ^
-p password -b couchmusic2 -f sample ^
-d file://couchmusic2-playlists-2.zip -t 2 -g %type%::%id%

cbimport json -c couchbase://127.0.0.1 -u Administrator ^
-p password -b couchmusic2 -f sample ^
-d file://couchmusic2-playlists-3.zip -t 2 -g %type%::%id%
Load the data for the couchmusic3 bucket as follows
Change directories to the folder containing the couchmusic3 zip files. Issue the following cbimport commands.cbimport json -c couchbase://127.0.0.1 -u Administrator \ -p password -b couchmusic3 -f sample \ -d file://couchmusic3-countries.zip -t 2 cbimport json -c couchbase://127.0.0.1 -u Administrator \ -p password -b couchmusic3 -f sample \ -d file://couchmusic3-subregions.zip -t 2 cbimport json -c couchbase://127.0.0.1 -u Administrator \ -p password -b couchmusic3 -f sample \ -d file://couchmusic3-tracks.zip -t 2 cbimport json -c couchbase://127.0.0.1 -u Administrator \ -p password -b couchmusic3 -f sample \ -d file://couchmusic3-userprofiles.zip -t 2 cbimport json -c couchbase://127.0.0.1 -u Administrator \ -p password -b couchmusic3 -f sample \ -d file://couchmusic3-playlists-1.zip -t 2 cbimport json -c couchbase://127.0.0.1 -u Administrator \ -p password -b couchmusic3 -f sample \ -d file://couchmusic3-playlists-2.zip -t 2 cbimport json -c couchbase://127.0.0.1 -u Administrator \ -p password -b couchmusic3 -f sample \ -d file://couchmusic3-playlists-3.zip -t 2 cbimport json -c couchbase://127.0.0.1 -u Administrator \ -p password -b couchmusic3 -f sample \ -d file://couchmusic3-playlists-4.zip -t 2Here are the corresponding commands using the Windows line break
cbimport json -c couchbase://127.0.0.1 -u Administrator ^
-p password -b couchmusic3 -f sample ^
-d file://couchmusic3-countries.zip -t 2

cbimport json -c couchbase://127.0.0.1 -u Administrator ^
-p password -b couchmusic3 -f sample ^
-d file://couchmusic3-subregions.zip -t 2

cbimport json -c couchbase://127.0.0.1 -u Administrator ^
-p password -b couchmusic3 -f sample ^
-d file://couchmusic3-tracks.zip -t 2

cbimport json -c couchbase://127.0.0.1 -u Administrator ^
-p password -b couchmusic3 -f sample ^
-d file://couchmusic3-userprofiles.zip -t 2

cbimport json -c couchbase://127.0.0.1 -u Administrator ^
-p password -b couchmusic3 -f sample ^
-d file://couchmusic3-playlists-1.zip -t 2

cbimport json -c couchbase://127.0.0.1 -u Administrator ^
-p password -b couchmusic3 -f sample ^
-d file://couchmusic3-playlists-2.zip -t 2

cbimport json -c couchbase://127.0.0.1 -u Administrator ^
-p password -b couchmusic3 -f sample ^
-d file://couchmusic3-playlists-3.zip -t 2

cbimport json -c couchbase://127.0.0.1 -u Administrator ^
-p password -b couchmusic3 -f sample ^
-d file://couchmusic3-playlists-4.zip -t 2
For full detail on using cbimport, see the documentation: https://docs.couchbase.com/server/current/tools/cbimport-json.html
-
-
When using cbimport there are a few things to note
-
Any document value can be used for key generation. It is a common JSON design pattern to prefix document keys with a type identifier (e.g., "userprofile::aaa123").
-
When using cbimport, prefixing can be specified using key generation, as shown above.
-
Some of the settings, including the value for replication and flush will be changed. You will need to go back and edit the settings to set them back to the desired state (Replicas: Disabled, Flush: Enabled)
-
-
In the Couchbase UI, locate the list of buckets and make note of the total number of documents for each of the buckets. You will be asked in the assessment to provide the number of documents for one of the three buckets created.
-
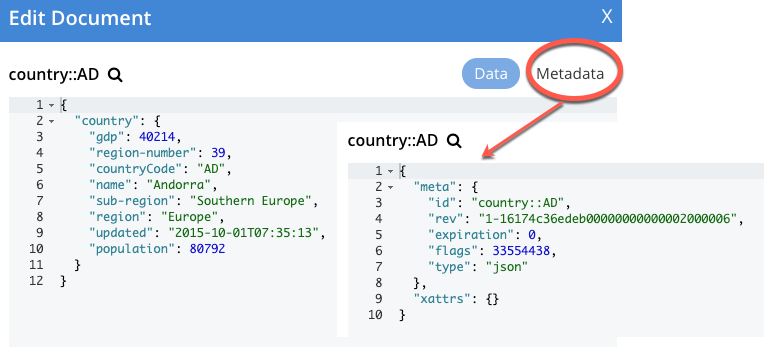
In the Documents screen, Edit the first document to review its structure.

-
Notice the related metadata object.

Lab summary
In this lab, you created three buckets, and then loaded data into the buckets from external data sets. You verified the successful loading of the data into the buckets by looking through the data in the buckets from the administrative interface.
At this point, you have your Couchbase server set up, data loaded and have verified that the data is ready to use. You are now ready to focus on writing the application code itself.
Congratulations! You have completed this lab.